Table of Contents
Introduction
The incline push-up is an amazing exercise for everyone, whether you are just starting out or already fit. Instead of doing a push-up on the floor, you put your hands on something higher, like a bench, a table, or a step. This makes the move easier because your legs carry more of your weight, so you don’t have to push as hard with your arms. It places a specific emphasis on the lower pectoralis major (lower chest) and the front deltoids while still engaging the triceps and core for stability. It is widely used to build the foundational strength and proper form necessary for standard push-ups while minimizing the vertical strain on the shoulder joints.

Incline Push-up
The incline push-up is a handy move that helps you progress from basic exercises to more advanced upper-body workouts. By keeping your chest higher than your feet, you create an angle that makes you feel lighter. It makes it a great, “budget-friendly” way for anyone to build arm strength without needing a lot of extra power or equipment. Above its accessibility, this activity is highly valued for isolating the sternocostal head of the chest and improving “pushing” techniques with less stress on the wrists and rotator cuffs than flat or decline versions. Whether used as a direct lift for a novice or a high-repetition finisher for a seasoned lifter, it stays a staple for developing a well-rounded, strong chest.
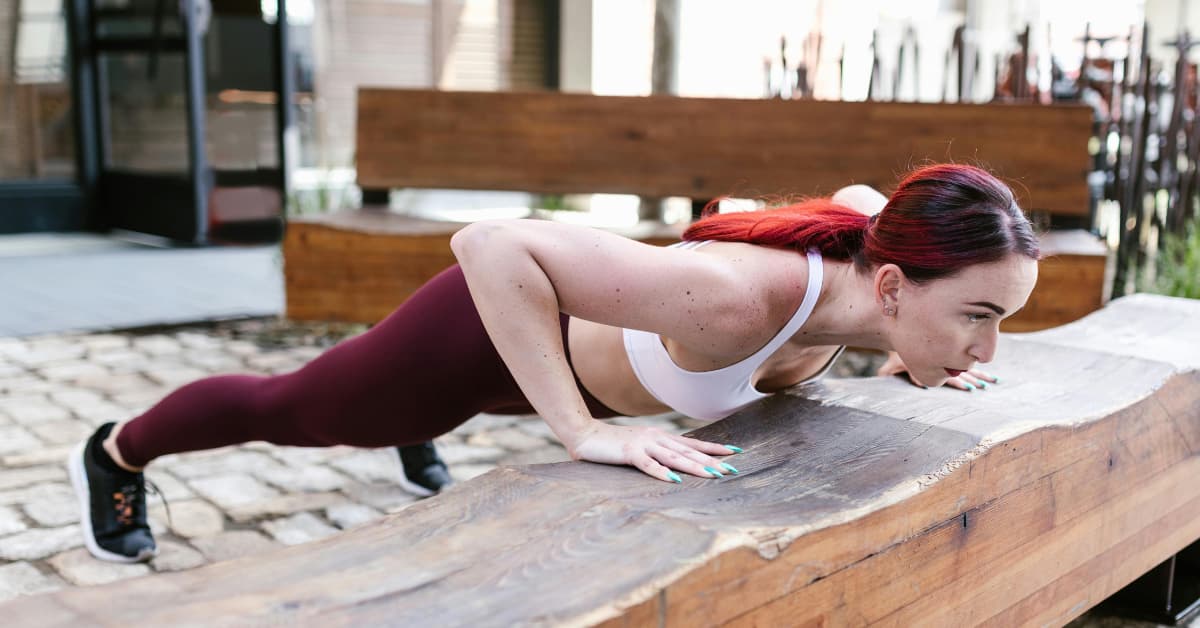
Incline Push-up Instruction
The incline push-up is a basic exercise in which you perform a push-up with your hands on a steady surface, such as a bench, step, or wall. It is perfect for beginners because the slant makes you lift less weight, so you can focus on doing the move correctly. For people who are already strong, it is a great way to work the lower chest and improve their push, while being easier on the wrists and shoulders than a floor push-up. Here is a simplified analysis of the incline push-up:
- Setup: Place the hands on a stable, elevated surface (bench, step, or table) slightly wider than shoulder-width.
- Alignment: Step back with your feet until your whole body is straight from your head to your heels. Make sure you don’t let your hips sag or your back arch, so that you look like a straight board from top to bottom.
- Core: Tighten the abs and glutes to keep the hips from sagging.
- Lowering: Inhale, then lower your chest toward the surface by bending your elbows at 45 degrees.
- Pushing: Exhale and push back up to the start, concentrating on driving through your palms.
- Progression: The higher the surface, the more comfortable the move; the lower the surface, the greater the challenge.

Incline push-up target: Which part of the chest
The incline push-up primarily targets the lower chest.
While a standard push-up works the whole chest relatively evenly, changing the angle of the body shifts the focus:
- Primary Target: This exercise focuses on the lower part of your chest. Since your hands are higher than your feet, you are pushing downward across your body. This angle puts most of the work on the lower chest muscles, helping them get stronger and more defined.
- Secondary Muscles:
- Triceps: The back of your arms, which help extend the elbow.
- Anterior Deltoids: The front of your shoulders.
- Core: Your abs and glutes work together to keep your body in a straight line.

Incline push-up benefits
1. Targets the Lower Chest:
It emphasizes the lower pectoralis major, helping define the bottom curve of the chest.
2. Easier for Beginners:
When you put your hands on a higher surface, you don’t have to lift as much of your own weight. It makes it the perfect starting move for anyone who finds regular floor push-ups too difficult.
3. Reduces Joint Stress:
The upright angle places less pressure on the wrists and shoulders than flat or decline push-ups.
4. Improves Core Stability:
Just like a plank, it needs you to engage the abs and glutes to keep your body straight, strengthening your midsection.
5. Versatile Progression:
You may easily adjust the difficulty by changing the height of the surface (e.g., transferring from a high table to a low step).
6. Requires No Gym Equipment:
It can be completed anywhere, using a park bench, a kitchen counter, a sturdy chair, or even a wall.
7. Enhances Tricep Strength:
While it targets the chest, it is a compound exercise that builds functional strength in the back of the arms.
8. Corrects Pushing Form:
Because it is less taxing, it allows you to focus on proper elbow tucking and shoulder blade movement before moving on to more advanced variations.
9. Great for High-Rep Volume:
Advanced athletes can use it as a “finisher” to safely burn out the chest muscles at the end of a workout.
10. Improves Cardiovascular Health:
Because this move works several muscles at once, it gets your heart pumping faster. It helps keep your heart strong and enables you to burn more calories.
11. Functional Upper-Body Power:
It mimics everyday activities, such as pushing a heavy door or pushing yourself up from a seated position.

Incline push-up variations
While the standard incline push-up is a great starting point, you can modify the movement to change the difficulty or target specific muscle groups.
1. Close-Grip Incline Push-up (Triceps Focus)
- How: Place your hands closer together on the bench (narrower than shoulder-width).
- Target: Shifts the load from the chest to the triceps and inner chest.
2. Wide-Grip Incline Push-up (Chest Focus)
- How: Move your hands further apart on the elevated surface.
- Target: This move stretches your chest muscles more, which means your arms don’t have to do as much of the work.
3. Plyometric Incline Push-up (Power Focus)
- How: Push yourself up with enough force that your hands momentarily leave the bench.
- Target: Builds explosive power and fast-twitch muscle fibers. Advanced users can add a clap mid-air.
4. Single-Leg Incline Push-up (Core Focus)
- How: Perform the movement while lifting one leg off the ground.
- Target: Adds a balance challenge that forces your abs and obliques to work much harder to keep your hips level.
5. Stability Ball Incline Push-up (Stability Focus)
- How: Place your hands on an unstable surface like a stability ball (Swiss ball) instead of a solid bench.
- Target: Activates the small stabilizer muscles in the shoulders and core to keep the ball from moving.
6. Incline Shoulder Tap Push-up
- How: At the top of each rep, lift one hand to tap the opposite shoulder.
- Target: Improves unilateral stability and coordination
Incline push-up wall
The wall incline push-up is the gentlest version of the exercise, making it the perfect starting point for anyone new to fitness or recovering from an injury. By standing upright and placing your hands against a wall, you carry very little of your own body weight, which takes the pressure off your joints while you learn the movement. It is a great way to build fundamental strength in your chest and arms and improve your posture without the intensity of a floor push-up. As you get stronger and more comfortable, you can move your feet further back or find a lower surface to make the workout a bit harder.
Incline push-up on the bed
Performing an incline push-up on a bed is a convenient way to exercise at home, especially if you want a softer surface for your hands and wrists than a hard floor or a wooden bench. Since most beds are at a medium height, this version provides a moderate challenge, harder than a wall push-up but easier than one on the floor. However, because a mattress is soft and can sink, your core and stabilizer muscles have to work harder to maintain balance. It is essential to place your hands near the edge of the mattress where it is most firm to stay steady while you work your chest and arms.
Reverse Incline Push-up
A reverse incline push-up, also known as a decline push-up, is an advanced variation in which you place your feet on an elevated surface—like a bench, chair, or step—while keeping your hands on the floor. By shifting your weight toward your upper body, this move increases the resistance and makes you lift a much larger percentage of your body weight. Unlike the standard incline push-up, which focuses on the lower chest, this version targets the upper pectorals and shoulders. It is a challenging exercise for those who have mastered regular push-ups and want to build more power and definition in the upper chest.
Precautions and Common Errors
To keep your workout safe and effective, here are some simple things to watch out for when doing incline push-ups.
Common Errors
- Sagging Hips: Letting your middle sink toward the floor. It happens when you don’t tighten your abs, and it can hurt your lower back.
- Flaring Elbows: Pointing your elbows straight out to the sides (like a “T” shape). It puts too much stress on your shoulder joints.
- Half-Reps: Not going low enough or not straightening your arms at the top. You get better results by doing the whole movement.
- Looking Up: Cranking your neck up to look at the wall. It can strain your neck muscles.
Important Precautions
- Check Stability: Always make sure the bench, table, or chair you are using is heavy and won’t slide away from you while you push.
- Wrist Health: If your wrists hurt, try grabbing the edge of the surface (like the side of a bench) instead of putting your palms flat on top.
- Surface Grip: Avoid using slippery surfaces or wearing socks on a smooth floor, as your feet might slide out from under you.
- Pain vs. Effort: You should feel your muscles working, but you should never feel sharp pain in your shoulders, elbows, or back. If you do, stop and check your form.
Conclusion
In conclusion, the incline push-up is a highly effective and adaptable exercise that belongs in almost any fitness routine. Whether you are a beginner using a wall to build your very first bit of pushing strength or an experienced athlete using a bench to define your lower chest, this move offers a safer, more manageable way to build upper-body power. By focusing on a straight body line and proper elbow positioning, you can strengthen your chest, shoulders, and arms while protecting your joints. It is a simple, go-anywhere workout tool that bridges the gap between starting and reaching your peak physical strength.