Table of Contents
Introduction
The Bent Over Rows is one of the most useful compound movements or exercises for building a thick, powerful back. Often called the “bench press” of the posterior chain, this movement involves hinging at the hips and pulling a weight against gravity, moving the entire upper body in unison. By targeting major muscle groups, for example, the latissimus dorsi (“lats”), traps, rhomboids, and rear deltoids, it makes the density and width essential for the coveted V-taper body.
Unlike machine-based options, the free-weight nature of the bent-over row also demands effective stabilizer recruitment, thereby allowing the core and lower back to grow stronger alongside the primary pulling muscles.
Nevertheless, the value of this activity extends far beyond simple muscle growth; it is a vital tool for maintaining structural balance and fixing postural alignment.
The Bent Over Row supports or helps the specific muscles responsible for scapular retraction, really pulling the shoulders back into a correct, healthy, neutral position. While it offers immense advantages, it is also a technically demanding lift that requires strict form to maximize effectiveness and minimize injury risk. Learning this movement is not just about moving heavy weights—it is about remembering to control your body’s mechanics to forge a resilient, injury-proof upper body.

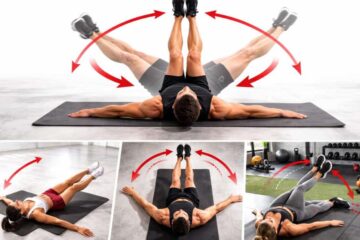
Bent Over Rows
The Bent Over Rows is a powerhouse movement that builds a strong, broad back and enhances the overall posture. By leaning forward at the hips and pulling a weight toward the torso, you engage nearly every muscle in the upper back, including the lats and rhomboids, while the core works hard to keep you stable. This activity is perfect for anyone trying to fix “slumped” shoulders forced by sitting at a desk, as it strengthens the muscles that support standing tall. Whether you use a barbell or dumbbells, getting this lift is the key to developing a thick, resilient upper body that looks as good as it performs.
How to do bent-over rows with proper form
- Stand behind a barbell with the feet shoulder-width separated.
- Bend at the hips while maintaining the back straight & knees slightly bent. Think of sitting back slightly (moving the tailbone behind your feet) — this helps position you for lifting the barbell. The body should be bent forward at about a 45-degree angle, but no further.
- Hold the bar a little wider than shoulder-width apart, holding your forearms pronated (palms facing your shins).
- Tighten the glutes and core as you pull the elbows up behind you, bringing the bar to the abs. Keep pulling the elbows behind you and squeezing the shoulder blades together while keeping the back straight.
- Hold for one second and then slowly lower the bar back to the starting position, with your arms stretched and the barbell plates just off the ground.
- Repeat this for 6–12 repetitions, then complete three sets.

Bent Over Rows benefits
Here are 15 distinct advantages of the Bent Over Rows, split down into simple classes so they are easy to read.
Aesthetic (Look Good) Benefits of Bent Over Rows
- Creates the “V-Taper”: It targets the lats (the enormous side muscles), which broaden the back and make the waist look slimmer by comparison.
- Adds Back Thickness: unlike pulldowns, which mainly build width, rows build “density” in the medium back, getting rid of that bony look.
- Builds Bigger Biceps: Your arms have to bend to pull the weight. Heavy rows are really one of the best mass-builders for biceps.
- Targets the Rear Shoulders: hits the “rear delts” (back of the shoulder), a muscle group often underdeveloped but crucial for a 3D shoulder look.
- Sculpts the Traps: It performs the middle and lower trapezius muscles, giving the upper back a detailed, muscular impression.
Functional & Health Benefits of Bent Over Rows
- Fixes “Computer Posture”: It strengthens the specific muscles that pull the shoulders back, fighting the “hunchback” look caused by phones and desks.
- Increases Grip Strength: Holding a heavy barbell or dumbbells for multiple reps strengthens your forearms and hands.
- Strengthens Lower Back Endurance: Holding the bent-over position requires your lower back muscles to hold still (isometrically), making them more resilient to fatigue.
- Engages the Core: Your abs and obliques must work overtime to stop your torso from twisting or collapsing, acting like a natural corset.
- Builds Stronger Bones: The heavy load places stress on your spine and hips (in a good way), which signals your body to increase bone density.
Performance (Gym) Benefits of Bent Over Rows
- Improves Bench Press: A thick back provides a stable “shelf” for you to lie on during bench presses, helping you push more weight and feel more stable.
- Assists the Deadlift: The upper back strength gained from rows enables you to keep the bar close and lock out heavy deadlifts.
- Burns High Calories: Because you use your legs, back, and arms simultaneously, your heart rate spikes, burning more fat than with isolation exercises.
- Time Efficient: You work 5+ major muscle groups in a single set, saving you time in the gym.
- Versatile Options: You can easily change the focus by switching your grip (underhand hits the biceps more; overhand hits the upper back more) or the tool (dumbbells vs. a barbell).

Bent Over Rows Variations
Changing the way you hold the weight or the equipment you use can completely change which part of your back the exercise targets. Here are the most effective variations of the Bent Over Rows.
1. Barbell Variations
These are best for building maximum strength and overall mass.
- Conventional Barbell Row (Overhand Grip)
- How it works: You hold the bar with palms facing your body (pronated). You bend over until your torso is almost parallel to the floor.
- Best For: Upper back thickness (Rhomboids and Traps). It requires good flexibility.
- Reverse Grip Row (Yates Row)
- How it works: You hold the bar with palms facing up (supinated) and stand a bit more upright (torso at 45 degrees).
- Best For: Hitting the Lower Lats and Biceps. It allows you to lift heavier weights but puts more stress on the bicep tendon.
- Pendlay Row
- How it works: Each rep starts from the floor (dead stop). You pull explosively to the chest and drop it back to the floor.
- Best For: Explosive power and strict form. Because the weight rests on the floor between reps, it gives your lower back a tiny break.
2. Dumbbell Variations
These are great for fixing muscle imbalances (one side stronger than the other) and increasing range of motion.
- Single-Arm Dumbbell Row (“The Chainsaw”)
- How it works: You place one hand and one knee on a bench for support, then row with the free arm.
- Best For: Range of motion. You can pull the weight higher and stretch deeper than with a barbell. It is also much safer for the lower back.
- Chest-Supported Row (Incline Bench Row)
- How it works: You lie face down on an incline bench and row dumbbells (or a bar).
- Best For: Isolating the back. Because your chest is supported, you cannot “cheat” by swinging your body. It takes the lower back completely out of the equation.
- Kroc Row
- How it works: A high-rep, heavy version of the single-arm row. You use a very heavy dumbbell and let a bit of body English (momentum) carry you to 20+ reps.
- Best For: Grip strength and mental toughness.
3. Landmine & Machine Variations
These provide a unique angle of pull that feels very natural.
- T-Bar Row
- How it works: You stand over a bar anchored at one end (or a machine) and pull a V-handle toward your chest.
- Best For: Mid-back Thickness. The neutral grip (palms facing each other) is firm, allowing you to pile on a lot of weight.
- Meadows Row
- How it works: You stand perpendicular to a landmine bar and grab the thick end of the barbell sleeve with one hand.
- Best For: Upper Lats and gripping power. The thick bar makes your forearms work harder.

Bent Over Rows: Precautions and Common Mistakes
Because the Bent Over Rows requires you to hold a heavy weight while bent forward, it is one of the easiest exercises to mess up. Poor form here doesn’t just reduce muscle growth—it sends people straight to the chiropractor.
Here are the critical mistakes to avoid and precautions to take.
Common Mistakes (Technical Errors)
1. Rounding the Lower Back (The “Cat Back”)
- The Mistake: Letting your spine curve forward like a slouching cat.
- Why it’s bad: This puts massive, uneven pressure on your spinal discs, which is the cause of herniated discs in this exercise.
- The Fix: Stick your butt out and keep your chest up. Your back should be as flat as a table.
2. Using Momentum (The “Body English”)
- The Mistake: Yanking the weight up by jerking your torso up and down, rather than just moving your arms.
- Why it’s bad: You are using momentum, not muscle, to lift the weight. Your back muscles stop growing, and your lower back takes a beating.
- The Fix: Keep your torso frozen in place. Only your arms should move. If you have to swing, the weight is too heavy.
3. Standing Too Upright
- The Mistake: Being afraid to bend over, so you only lean forward slightly (like 15 degrees).
- Why it’s bad: This turns the exercise into a “Shrug” for your shoulders rather than a “Row” for your back. You miss the primary target muscles.
- The Fix: You need to be bent over at least 45 degrees (halfway between standing and flat).
4. Curling the Wrists (The “T-Rex” Hands)
- The Mistake: Curling your wrists inward, as if you’re revving a motorcycle.
- Why it’s bad: This forces your forearms to do the work instead of your back. You’ll get tired arms before your back even feels the burn.
- The Fix: Keep your wrists straight, like a stiff hook. Think about pulling with your elbows, not your hands.
5. Chicken Necking
- The Mistake: Looking straight up at the mirror or ceiling while bent over.
- Why it’s bad: This crunches the vertebrae in your neck (cervical spine) and disrupts your spinal alignment.
- The Fix: Look at the floor about 3 feet in front of you. Your neck should be in a straight line with your back.
Precautions (Safety Guidelines)
1. Protect Your Lower Back First. If you have a history of lumbar disc issues (sciatica, slipped disc), the unsupported Bent Over Row might be too risky.
- Precaution: Switch to a Chest-Supported Row or One-Arm Dumbbell Row (using a bench). These support your weight, so your spine doesn’t have to.
2. The “Soft Knees” Rule: Never lock your knees straight. It strains the hamstrings and rounds your lower back.
- Precaution: Keep a slight bend in your knees (in an athletic stance) at all times to act as a shock absorber.
3. Engage the Core Before You Lift. Don’t just bend over and pull.
- Precaution: Take a breath into your stomach and tighten your abs hard (brace) before every single rep. Your core is the only thing protecting your spine from collapsing.
4. Don’t Ego Lift The Bent Over Rows is a “strict” exercise, not a power contest.
- Precaution: If you cannot touch the bar to your body without jerking, drop the weight. A lighter weight with a pause at the top builds way more muscle than a heavy weight swung with momentum.
Conclusion
The Bent Over Rows is a powerhouse movement that builds a strong, broad back and enhances the overall posture. By leaning forward at the hips and pulling a weight toward the torso, you engage nearly every muscle in the upper back, including the lats and rhomboids, while the core works hard to keep you stable.