Table of Contents
Introduction
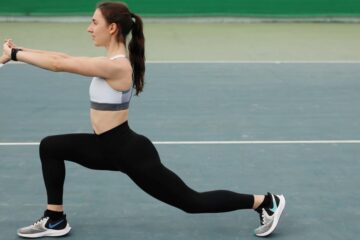
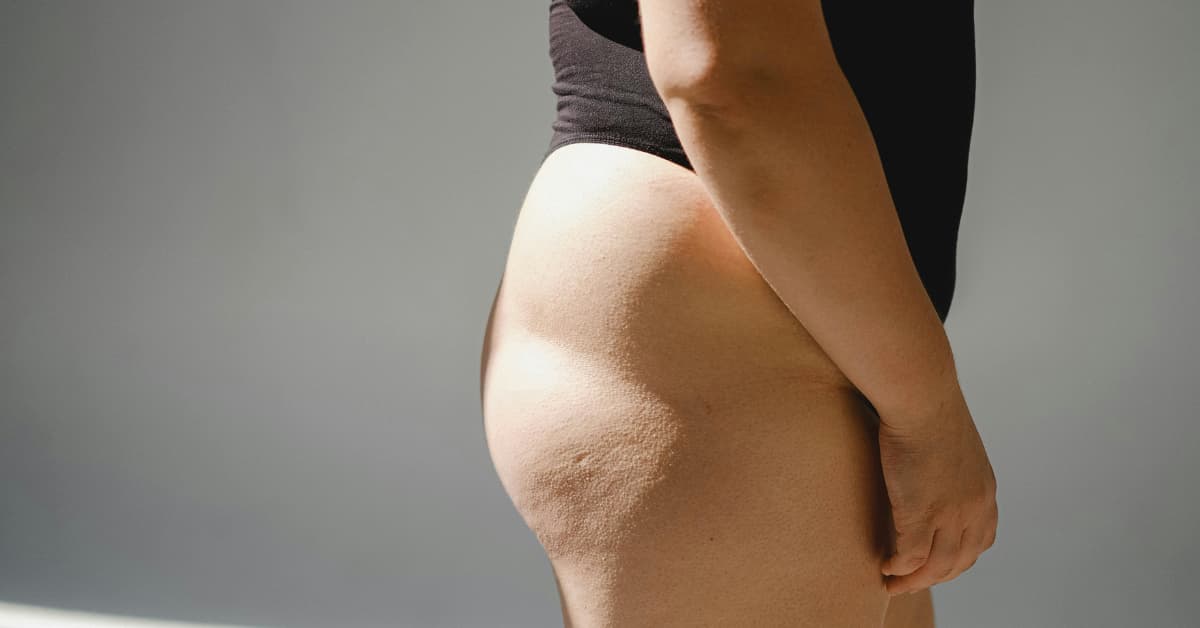
“Hip dips” exercises are targeted workouts designed to strengthen the muscles surrounding the pelvic area, particularly the gluteus medius, gluteus minimus, & tensor fasciae latae (TFL). It is necessary to note that hip dips, the naturally occurring inward curves between the hip bone & the thigh, are mainly determined by skeletal structure and fat distribution rather than muscle tone alone. While no exercise or training can physically eliminate these indentations, a focused routine applying movements like clamshells, side-lying leg raises, and fire hydrants can help build muscle mass in the “side butt” area. By hypertrophy of these lateral muscles, individuals may achieve a stronger, more sculpted lower body profile & improved pelvic stability.

What are hip dips?
To understand the techniques of these exercises, it is vital to recognize that they focus on hip abduction & lateral rotation, which are the preliminary functions of the gluteus medius. Because hip dips are primarily a result of a wide gap between the ilium (hip bone) & the greater trochanter of the femur, the “fill-in” effect is achieved by increasing the cross-sectional area of the muscle fibers sitting directly over that skeletal dip.
Beyond aesthetics, strengthening these exact muscles is vital for functional kinetic alignment; robust hip abductors prevent the knees from caving inward during compound movements or training like squats & lunges, thereby reducing the chance of ACL & IT band injuries. Incorporating resistance bands or ankle weights into these activities further enhances mechanical tension, the preliminary driver of the muscle growth needed to create a smoother transition from the iliac crest to the upper thigh.

Hip Dips reason
To give you a more complete look at why hip dips occur, we have to look past just the basics of “bone vs. fat.” Here are six complicated causes why hip dips are a well-known feature of the specific anatomy:
1. The Height of the Iliac Crest
The iliac crest is the curved top ridge of the pelvis. If the hip bones are positioned higher on the torso, it increases the vertical distance between the hip & the leg (femur). This larger vertical gap creates a longer “dip” area that is much harder for muscle or fat to bridge naturally, making the indentation appear more extended.
2. The Width of the Pelvis
Evolutionarily and genetically, some individuals have a wider pelvic bowl. When the pelvis is wide, the more significant trochanter (the top of the thigh bone) doesn’t “poke out” as much as the hip bone does. It produces a sharper inward angle from the hip bone down toward the leg, resulting in the “violin hip” shape.
3. Femoral Neck Length and Angle
The “neck” of the femur is the short piece of bone that connects the ball-and-socket joint of the hip to the leg. If you have a longer femoral neck or a specific angle where the bone attaches to the hip, it pushes the thigh bone further outward or inward. It decides how much the skin is stretched or tucked in at that specific junction.
4. Body Fat Percentage and Distribution
While the dip is skeletal, its visibility is controlled by the presence of fat.
- Low Body Fat: If you are very lean, there is less subcutaneous fat to “cushion” the area, causing the underlying bone structure to be obvious.
- High Body Fat in Surrounding Areas: If your body tends to store fat on the iliac crest (waist) and the outer thigh, the “valley” between those two “hills” looks more serious by contrast.
5. Muscle Volume of the Gluteus Medius
The gluteus medius is the muscle that sits directly underneath the hip dip. Because this is a stabilizer muscle rather than a “power” muscle (like the gluteus maximus), it is innately flatter. If this muscle is underdeveloped, it leaves the skeletal indentation “hollow.” Even if you are fit, if you haven’t particularly targeted the abductors, the dip remains prominent.
6. Skin Elasticity and Connective Tissue
The way the skin and fascia (the connective tissue under the skin) attach to the greater trochanter plays a role. In some individuals, the skin is more tightly “tethered” to the bone at that specific point. It makes a dimpling effect similar to a button on a tufted sofa, creating a dip in the cushion & preventing the skin from lying perfectly flat across the gap.

How to get rid of hip dips
To “get rid of hip dips is a bit of a misnomer because you cannot change the bone structure you were born with. Nevertheless, you can fill them out and make the transition from hip to thigh appear softer by building the muscles that sit directly in that dip: the gluteus medius & gluteus minimus.
- Hip Dips exercise
Top Exercises for Hip Dips
These exercises specifically target “hip abduction,” the motion of pulling the leg away from the body, which is the only way to grow the side glute muscles.
| Exercise | Primary Target | Frequency |
| Fire Hydrants | Gluteus Medius | 3 sets of 15–20 per side |
| Clamshells | Side Glutes & Minimus | 3 sets of 20 per side |
| Side-Lying Leg Raises | Outer Hip / Medius | 3 sets of 20 per side |
| Curtsy Lunges | Glute Medius & Quads | 3 sets of 12 per side |
| Glute Bridges | Glute Maximus & Minimus | 3 sets of 15 |
| Banded Lateral Walks | Full Outer Glute | 3 sets of 15 steps (each way) |
Step-by-Step Instructions
- Clamshells: Lie on your side with the knees bent at 90 degrees and the feet stacked. Keeping the feet touching, lift the top knee as high as possible without rotating the hips backward. Squeeze at the top and lower slowly.
- Fire Hydrants: Get into the tabletop position (all fours). Keeping the knee bent at 90 degrees, lift one leg out to the side until it’s level with the hip. Imagine a dog at a fire hydrant. It is the most effective move for “filling” the side area.
- Side-Lying Leg Raises: Lie on the side with legs straight. Lift the top legs towards the ceiling, keeping he toes pointed little downward and backward (this ensures the glute medius does the work rather than the hip flexors).
- Curtsy Lunges: Stand with feet hip-width apart. Step the right leg back and across behind the left leg, bending both knees as if you are curtsying. Keep the front foot facing forward.
- Side Plank with Hip Dips: Get into a side plank on the forearm. Lower the hip until it nearly touches the floor, then use the side muscles to “snap” it back up to the starting position.
- Glute Bridges (with Abduction): Lie on the back with the knees bent. Lift the hips into a bridge. While holding the bridge, push the knees outward against a resistance band (or just the air) before lowering back down.
Tips for Better Results
- Time Under Tension: Don’t rush. The gluteus medius reacts best to slow, controlled movements.
- The “Toe-Down” Trick: During leg raises, point the toes toward the floor. It rotates the hip internally and forces the side glute to take 100% of the weight.
- Add Resistance: Once bodyweight becomes easy, use a fabric resistance band (placed just above the knees) to boost muscle growth.

Secrets for Faster Results
- Progressive Overload: Your side glutes are small muscles. Once 15-20 reps feel easy, you must add a resistance band or more reps to keep the muscle growing.
- Mind-Muscle Connection: Slow down. If you swing the legs too fast, you’re relying on momentum rather than muscle. Feel the “burn” on the very side of the hip.
- Frequency: Aim to perform these specific moves 3 to 4 times a week. Muscles need 48 hours to recover & grow, so don’t do them every single day.
- Nutrition: Ensure you are eating enough protein. Muscles cannot “fill in” an area if they don’t have the building blocks (amino acids) to grow.
Hip Dips before and after
When looking at “before and after” results for hip dips, it is important to distinguish between fitness transformations and cosmetic procedures, as the results look very different.
Because hip dips are a result of the skeleton (the gap between the pelvis and femur), you cannot “delete” the indentation, but you can change the silhouette around it.
1. Fitness “Before & After” (Muscle Growth)
In fitness transformations, the “after” often doesn’t show a completely straight line from the hip to the thigh. Rather, it shows a fuller, firmer side profile.
- The Change: By growing the gluteus medius (side glute), the area directly inside the dip becomes less “hollow.” The muscle takes up more space, which can soften the dip’s sharp angle.
- The Look: The hips appear wider & more “sculpted.” Regardless, because muscle has a specific shape and doesn’t behave like a liquid filler, a slight natural curve usually remains.
- Timeline: Significant muscle-based changes typically take 3 – 6 months of consistent resistance training & a high-protein diet.
2. Weight Loss “Before & After.”
Interestingly, losing weight can make hip dips more visible.
- The Reason: If you have “love handles” (fat stored on the iliac crest), they can spill over the dip, partially masking it. When you lose that fat, the underlying skeletal dip becomes more defined.
- The Result: Many individuals find that as they get leaner and more athletic, their hip dips become a more prominent characteristic of their “fit” physique.
3. Cosmetic “Before & After” (Fillers/Surgery)
It is the only way to achieve a completely “flat” or “seamless” hip line.
- Fat Transfer (BBL): Doctors remove fat from the abdomen or back and inject it directly into the trochanteric fossa (the dip). The “after” is usually a very smooth, rounded curve.
- Sculptra/Fillers: These are non-surgical injections that add volume to the skin and tissue in the dip. The results are immediate but often temporary (lasting 1–2 years).
Several surgical and non-surgical procedures
Yes, several surgical and non-surgical techniques are available to address hip dips. Since the t-bone structure causes hip dips, these procedures add volume to the indentation, creating a smoother, more rounded silhouette.
Here are the preliminary options:
1. Fat Grafting (Fat Transfer)
It is the most common surgical solution and is often called a “Hip Flip” or part of a Brazilian Butt Lift (BBL).
- How it works: A surgeon performs liposuction to remove fat from another area of the body (such as the stomach, waist, or inner thighs). This fat is purified and then injected into the hip dip area.
- Results: The results look and feel very natural because they are your own tissue.
- Longevity: It is considered semi-permanent to permanent. Nevertheless, about 30% to 50% of the injected fat may be reabsorbed by the body in the first six months.
- Downtime: Expect 2–3 weeks of recovery. You often have to avoid lying on your side for several weeks to ensure the fat “takes.”
2. Hip Implants
It is a more invasive option for individuals who do not have enough body fat for a transfer.
- How it works: Custom-shaped silicone rubber implants are surgically positioned under the skin and fascia in the hip area through small incisions.
- Results: Supplies a permanent, consistent shape regardless of weight fluctuations.
- Risks: Higher risk than fat transfer, including the possibility of the implant shifting, infection, or the edges of the implant becoming visible.
- Downtime: Needs roughly 4–6 weeks for full recovery.
3. Dermal Fillers (Non-Surgical)
If you want to avoid surgery, you can use injectable fillers, though they are usually much more costly in the long run.
- Sculptra: a collagen stimulator. It doesn’t fill the area instantly; instead, it triggers the body to produce more collagen over several months.
- Hyaluronic Acid Fillers: These deliver instant volume (similar to lip fillers but in much larger quantities).
- Pros/Cons: There is no “downtime,” but the outcomes are temporary (lasting 1–2 years). Because the hip area is large, it can take many vials of filler, making it very costly.
Comparison Table
| Feature | Fat Grafting | Hip Implants | Fillers (Sculptra/HA) |
| Type | Surgery | Surgery | Injectable (Non-surgical) |
| Material | Your own fat | Silicone | Collagen stimulator/Gel |
| Downtime | 2–3 weeks | 4–6 weeks | None |
| Longevity | Permanent (mostly) | Permanent | 1–2 years |
| Best For | People with donor fat | Very lean individuals | Subtle corrections |
Important Note
Hip dips are a regular anatomical feature. If you are considering surgery, it is necessary to consult a board-certified plastic surgeon or doctor to discuss the chances, as any surgery carries potential complications like: infection, scarring, or asymmetry.
Conclusion
In conclusion, hip dips are a completely standard and common anatomical feature determined primarily by skeletal structure, especially the width of the pelvis and the gap between the hip and thigh bones. While they are often portrayed as a “flaw” by social media trends, they are simply reflections of how the body is built.
If you wish to change the appearance of the hip profile, you have three distinct paths:
- Fitness: Focus on “filling” the area by building the gluteus medius through targeted resistance activities like fire hydrants & clamshells. While this won’t “erase” the bone structure, it creates a firmer, more sculpted silhouette.
- Nutrition & Body Composition: Managing body fat can help lower the appearance of “love handles” or “saddlebags,” which often make the natural dip in the middle look more prominent.
- Cosmetic Procedures: For those seeking a perfectly smooth, rounded curve that anatomy cannot naturally provide, surgical options like fat grafting or non-surgical dermal fillers are the only ways to fill the depression physically.
Finally, the most sustainable approach is a combination of strength training to support the joints and self-acceptance of the unique bone structure.