Table of Contents
Introduction
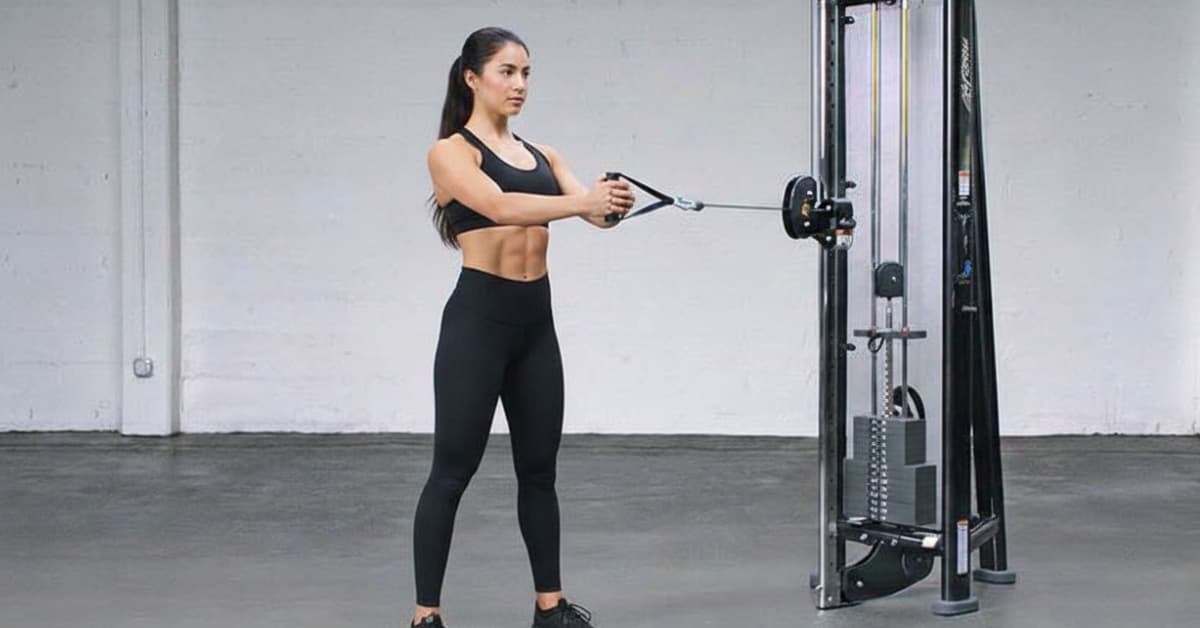
The Pallof Press is an exclusive anti-rotational core training that builds stability throughout the entire trunk by resisting an external lateral force. Called after physical therapist John Pallof, the activity involves standing perpendicular to a cable machine or a resistance band, keeping the handle at chest height, and pressing it straight out in front of the body while resisting the tension that pulls the torso toward the anchor point.
Unlike traditional abdominal workouts that focus on flexion or rotation, the Pallof Press highlights isometric stability, forcing the obliques, transversus abdominis, & glutes to engage simultaneously to maintain a neutral spine. It creates an exceptionally functional movement to improve posture, protect the lower back, & enhance athletic performance in sports that require a “braced” core.

Pallof Press Exercise
Often overlooked but highly useful, the Pallof Press is a foundational “anti-movement” that prioritizes the core’s main role: stabilizing the spine against external forces. By standing sideways to a cable or band and pressing the resistance away from the chest, you create a long lever arm that tries to snap the torso toward the anchor; your job is to remain perfectly still. It makes intense tension through the internal and external obliques, as well as the deep stabilizers of the lower back. Because it highlights control & bracing over high-repetition “crunching,” it is frequently used by physical therapists & strength coaches to build a resilient, injury-proof midsection that can handle the unexpected loads of daily life and sports.
Pallof Press target muscles
The Pallof Press is primarily an “anti-rotational” motion, meaning its main goal is to challenge the muscles that keep the spine from twisting. While it is a full-body stabilizer, it particularly targets the following muscle groups:
Primary Target Muscles
- Obliques (Internal and External): These are the stars of the show—their work isometrically to prevent the torso from rotating toward the resistance (cable or band).
- Transversus Abdominis (TVA): This is the deepest layer of the core that acts like a natural corset, providing stability & internal pressure to protect the spine.
- Rectus Abdominis: While usually known for “six-pack” flexion, it also helps keep the trunk upright and braced.
Secondary (Supporting) Muscles
- Glutes (Maximus and Medius): The hips & glutes provide the “anchor.” They fire to prevent the lower body from shifting or the knees from collapsing.
- Erector Spinae: These muscles along the spine work to maintain a tall, neutral posture.
- Scapular Stabilizers: Because you are holding the weight out in front of you, the muscles around the shoulder blades (rhomboids and serratus anterior) must engage to keep the shoulders stable.
- Pectorals & Deltoids: These are used to hold and press the handle away from the chest.

Pallof Press Form and Instructions
Here is a breakdown of the proper form and step-by-step instructions for the Pallof Press.
The Setup
- Equipment: Utilize a cable machine with a standard D-handle or a medium-resistance band anchored at chest height.
- Stance: Stand perpendicular (sideways) to the anchor point. The feets should be shoulder width apart, knees slightly bent, & toes pointing forward.
- Grip: Hold the handle with both hands. Bring it to the center of the chest, keeping the elbows tucked against the ribs.
Step-by-Step Instructions
- Find the Tension: Step away from the anchor until there is enough tension to feel the weight trying to pull the torso to the side.
- Brace: Engage the core as if someone is about to punch you in the stomach. Squeeze the glutes to create a stable base.
- The Press: Slowly exhale & push the handle straight out in front of the chest until the arms are fully extended.
- The Hold: Maintain this position for 2–3 seconds. It is the hardest part, as the “lever” is now longer, making the rotational pull much stronger. Do not let the shoulders or hips turn.
- The Return: Inhale and slowly bring the handle back to the chest, resisting the urge to let the cable “snap” back.
- Switch: Complete the set, then turn 180° to repeat the process on the other side.
Pallof Press Benefits
This exercise is a staple in functional training because it addresses core stability in a way that crunches or sit-ups cannot. Incorporating this into a fitness routine offers several specific physical & athletic miracles.
1. Exceptional Spinal Protection
Most core exercises focus on training (flexion or rotation), but the Pallof Press focuses on anti-rotation. By training the muscles to resist being pulled out of alignment, you build a “braced” spine. It is one of the most effective ways to prevent lower back injuries caused by sudden twisting or improper lifting.
2. Improved Postural Alignment
Because this exercise needs a tall, neutral stance under lateral tension, it forces the deep trunk stabilizers and the muscles around the scapula (shoulder blades) to work together. Over time, this allows correct rounded shoulders and promotes a more upright, confident posture.
3. Enhanced Athletic Power
In sports like golf, tennis, or baseball, power is generated from the ground up and transmitted through the core. A “leaky” core loses that energy. The Pallof Press trains the core to remain rigid, ensuring that the force generated by the legs is efficiently or accurately transferred to the upper body for more powerful swings, throws, or strikes.
4. Corrects Muscle Imbalances
Since you perform the exercise one side at a time, it quickly reveals which side of the core is weaker. This unilateral focus allows for ensuring that both the left & right obliques are developing equally, lowering the chance of compensatory injuries.
5. Highly Scalable for All Levels
It is incredibly versatile. Beginners may start with a light resistance band to master the “bracing” sensation. At the same time, advanced athletes can use heavy cables or add movements (such as split squats or lunges) while holding the press to challenge their stability further.

Pallof press variations
1. Half-Kneeling Pallof Press
Instead of standing, drop one knee to the floor (the knee closest to the anchor point).
- Why it works: By taking the feet out of the equation, you stabilize the pelvis even more. It forces the glutes & hip stabilizers to work harder to keep you from tipping over.
- Best for: Improving hip mobility & core isolation.
2. Pallof Press with Rotation
Start with the standard press, but once the arms are extended, slowly rotate the entire torso away from the anchor point, then return to the center.
- Why it works: This moves from “anti-rotation” to “controlled rotation.” It guides the core on how to move a load through a range of motion while maintaining stability.
- Best for: Athletes in rotational sports like golf, tennis, or cricket.
3. Overhead Pallof Press
Perform the standard press, but once your arms are extended in front of you, slowly raise them toward the ceiling and then back down to chest height.
- Why it works: Raising the arms increases the “lever arm,” creating the resistance feel significantly heavier & challenging the upper back and shoulder stability.
- Best for: Advanced users looking to increase the intensity without adding more weight.
4. Split-Stance Pallof Press
Stand in a “staggered” or lunge-like position with one foot forward and one foot back.
- Why it works: This creates an unstable base, mimicking the activity patterns of running or walking. It’s excellent for “anti-shear” force protection in the spine.
- Best for: Runners and hikers.
5. Pallof Press with Lateral Walk
Hold the press at full extension and take 2–3 small side-steps away from the anchor, then 2–3 steps back.
- Why it works: The tension increases and decreases dynamically as you move, forcing the core to adapt to changing levels of resistance.
- Best for: Building “dynamic” stability.
Pallof Press alternative
You can still achieve similar anti-rotational advantages using these alternatives. These exercises all focus on the core’s ability to resist movement & maintain a neutral spine.
1. Single-Arm Plank (The “No-Equipment” Alternative)
It is the closest bodyweight equivalent to the Pallof Press.
- How to do it: Get into a standard push-up plank position. Keeping the hips perfectly level to the floor, lift one hand & tap the opposite shoulder (or reach forward).
- The “Pallof” Connection: The core must work intensely to prevent the hips from rotating or dipping toward the side of the lifted arm.
- Best for: Home workouts with zero equipment.
2. Dumbbell/Kettlebell Renegade Row
- How to do it: In a plank position with the hands on two dumbbells, row one weight up to the hip while balancing on the other.
- The “Pallof” Connection: As you lift the weight, gravity tries to pull the torso into a twist. You are doing a dynamic Pallof Press against vertical and rotational forces.
- Best for: Building raw strength and core stability simultaneously.
3. Dead Bug (Anti-Extension focus)
- How to do it: Lie on your back with arms reaching up and knees at 90 degrees. Slowly lower the opposite arm & leg toward the floor without letting the lower back arch.
- The “Pallof” Connection: While the Pallof Press is anti-rotation, the Dead Bug is anti-extension. Both train the deep core (TVA) to keep the spine neutral under tension.
- Best for: Beginners or those focusing on postpartum recovery, as it is very safe for the lower back.
4. Suitcase Carry
- How to do it: Hold a heavy dumbbell or kettlebell in only one hand and walk for 30–60 seconds while keeping the torso perfectly upright.
- The “Pallof” Connection: The weight is pulling you toward one side; the obliques must fire on the opposite side to keep you from leaning. It is “anti-lateral flexion.”
- Best for: Functional, real-world strength (like carrying a heavy grocery bag or a baby car seat).
5. Bird-Dog
- How to do it: On hands and knees, extend the opposite arm and leg. Hold for 3–5 seconds while keeping the back flat like a table.
- The “Pallof” Connection: It challenges rotational stability in a quadruped position, making it a great regression for those who find the standing Pallof Press too difficult.
Pallof Press: Precautions and Common Errors
Common Errors to Avoid
- Rotating the Torso: The most frequent mistake is letting the cable pull your shoulders or hips toward the anchor. If your chest isn’t facing “12 o’clock” throughout the entire move, you’ve lost the anti-rotational benefit.
- “Hiking” the Shoulders: Many people shrug their shoulders toward their ears when the tension gets heavy. It shifts the work from the core to the upper traps and neck.
- Hips Swaying: If the hips shift side to side as you press, the glutes aren’t properly engaged. The lower body should be “locked” into the floor.
- Holding Your Breath: Users often hold their breath to create internal pressure. Instead, you should exhale sharply as you press the weight away to better engage the transversus abdominis.
- Moving Too Fast: Momentum is the enemy here. Rushing the reps eliminates the time under tension that the stabilizers need to grow stronger.
Important Precautions
- Start Light: This isn’t a “max strength” lift. Always start with a lower weight than you think you need to ensure the form is perfect before increasing the load.
- Check Your Anchor: If using a resistance band at home, ensure it is attached to a sturdy, non-moving object. A snapping band can cause significant injury.
- Listen to the Lower Back: You should feel this on the sides (obliques) and in the deep stomach, not in the spine. If you feel a “pinch” or “pull” in the lower back, stop immediately. You are likely compensating for a weak core by arching your spine.
Conclusion
In conclusion, the Pallof Press is an important addition to any functional fitness routine, offering a unique focus on anti-rotational stability that most traditional core exercises miss. By teaching the body to resist external forces rather than simply moving through them, it builds a resilient, injury-proof spine and improves power transfer between the lower & upper body. Whether you are an athlete looking to enhance performance, a student aiming to correct posture during long study sessions, or someone navigating the physical demands of early parenthood, this versatile movement delivers the foundational strength needed for a healthier, more stable life.