Table of Contents
Introduction
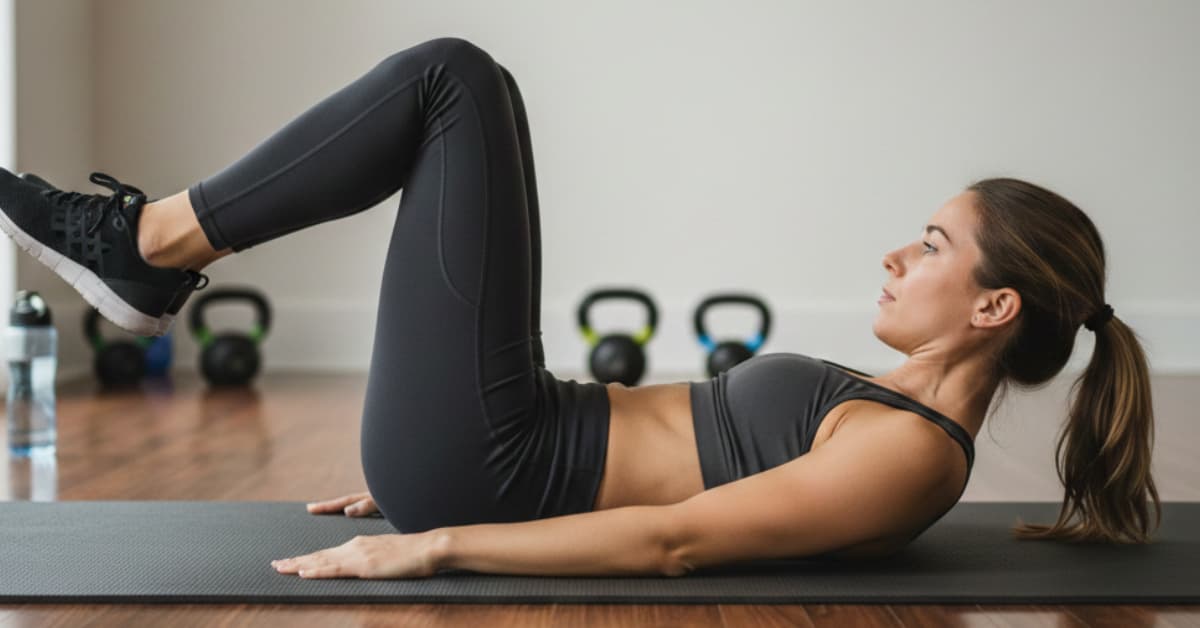
The Reverse Crunches is a highly effective core-strengthening exercise which mainly targets the lower abdominal muscles, offering a more spine-friendly alternative to the traditional crunch. Unlike standard crunches, or normal crunches that involve lifting the upper body toward the knees, this movement consists of lying on the back & pulling the knees toward the chest, effectively tilting the pelvis and engaging the rectus abdominis and obliques. Because the lower back remains supported against the floor throughout the range of motion, it is often favored by fitness enthusiasts looking to build deep core stability and definition without placing excessive strain on the neck or hip flexors.

Reverse Crunches Exercise
Often referred to as the “bottom-up” approach to core training, the Reverse Crunch is a functional bodyweight activity that isolates the lower abdominal wall. By stabilizing the upper body & using the abs to lift the hips off the ground, you create a powerful contraction that improves pelvic control & functional posture. This exercise is particularly valuable for athletes and beginners alike, as it helps bridge the gap between basic core work and more advanced movements like leg raises, making it a staple for anyone aiming to develop a strong, well-rounded midsection.
Reverse Crunches target muscles
While the main focus is on the lower abs, the Reverse Crunch is actually a multi-muscle stabilizer. Here is the breakdown of the muscles engaged during the movement:
Primary Muscles (The Prime Movers) of Reverse Crunches
- Rectus Abdominis: Specifically, the lower portion of the “six-pack” muscle. While the entire muscle contracts, the bottom-up motion emphasizes the area below the belly button.
- External and Internal Obliques: These muscles on the sides of your torso work to stabilize the pelvis and assist in the curling motion as your hips leave the floor.
Secondary Muscles (The Stabilizers)
- Transverse Abdominis: The deepest or most extensive layer of the core. It acts like a natural corset, keeping your spine protected and your midsection tight during the lift.
- Hip Flexors (Iliopsoas): These assist in bringing the knees toward the chest, though the goal of a “reverse” crunch is to minimize their involvement to keep the tension on the abs.
Reverse Crunches: Form and Instructions
Here is a step-by-step guide for the Reverse Crunch:
Setup: The Starting Position
- Lie Flat: Start by lying on your back on a comfortable mat.
- Arm Placement: Place the arms by the sides, palms down, for stability. If you need extra support for your lower back, you can tuck your hands slightly under your glutes.
- Leg Position: Lift your legs and bend your knees to 90 degrees, so the thighs are perpendicular to the floor, & the shins are parallel to it.
The Movement: Step-by-Step
- The Bracing: Inhale and brace your core by pulling the belly button toward the spine. Ensure the lower back is pressed firmly against the mat.
- The Lift: As you exhale, use the lower abs to curl the hips toward the ribcage. Your knees should move toward your chest.
- The “Crunch”: At the top of the movement, your hips should come off the floor slightly. Focus on “curling” the pelvis rather than just swinging your legs.
- The Descent: Inhale as you slowly & steadily lower your hips back to the starting position. Control is key here; do not let gravity or momentum drop your legs back down.
- The Reset: Stop once your thighs are back to the 90-degree vertical position. Avoid letting the feet touch the floor between reps to keep constant tension on the muscles.

Reverse Crunches Benefits
The Reverse Crunch offers several unique advantages that make it a superior choice for core development, especially for those who find traditional sit-ups uncomfortable.
1. Targeted Lower Abdominal Development
While it’s impossible to completely “isolate” the lower abs, the reverse crunch uses a posterior pelvic tilt to put the highest mechanical tension on the lower portion of the rectus abdominis. It helps develop definition in the area that is often hardest to reach with upper-body crunches.
2. Reduced Neck and Back Strain
In a standard crunch, people often pull on their necks or strain their cervical spine. In a reverse crunch, your head and shoulders stay flat on the mat. Furthermore, because the movement starts from the legs, it’s easier to keep the lumbar spine (lower back) pressed into the floor, reducing the risk of “arching” that can cause back pain.
3. Improved Pelvic Stability and Posture
By strengthening the muscles responsible for tilting the pelvis, this exercise can help counteract Anterior Pelvic Tilt (a common condition where the lower back arches excessively due to tight hip flexors and weak abs). It leads to better standing posture and reduced lower back pressure.
4. Enhanced Functional Strength
A strong lower core is essential for stability in almost every other lift, including squats and deadlifts. The reverse crunch builds the deep, stabilizing strength of the transverse abdominis, which acts as an internal brace for your entire midsection.
5. Progression to Advanced Moves
The reverse crunch is a perfect “gateway” exercise. It builds the foundational strength and mind-muscle connection needed for more difficult hanging leg raises, dragon flags, or L-sits.

Reverse Crunches variations
Here are the most effective variations of the Reverse Crunch, ranging from beginner-friendly to advanced.
1. Straight-Leg Reverse Crunch (Advanced)
Instead of keeping your knees bent at 90 degrees, keep your legs completely straight throughout the movement.
- The Challenge: A longer lever arm significantly increases the weight your lower abs must lift.
- Pro-Tip: Focus on reaching your heels toward the ceiling at the top of the movement.
2. Decline Bench Reverse Crunch (Expert)
Perform the exercise while lying on a decline bench with your head at the top, holding onto the bench’s handle or the padding.
- The Challenge: Gravity works against you over a larger range of motion. Because your body is angled downward, you have to lift your hips “uphill,” creating intense tension.
3. Stability Ball Reverse Crunch (Balance Focus)
Place a stability ball between the feet & calves, squeezing it as you perform the crunch.
- The Challenge: This engages the inner thighs (adductors) and requires more stabilization from the deep core to keep the ball from wobbling or falling.
4. Resistance Band Reverse Crunch (Consistent Tension)
Anchor a resistance band to a sturdy post behind you and loop the other end around your ankles.
- The Challenge: Unlike bodyweight alone, where the tension can drop off at the bottom, the band provides linear variable resistance, meaning the tension increases as you pull the knees closer to the chest.
5. Alternating Reverse Crunch (Oblique Focus)
As you bring the knees toward the chest, twist the pelvis slightly so the knees move toward one shoulder, then alternate sides.
- The Challenge: This shifts the emphasis to the internal and external obliques, helping to carve out the sides of the midsection.
Reverse crunches alternative
These exercises target the same lower-abdominal region but use different angles or equipment.
1. Hanging Knee Raises (The Vertical Alternative)
Instead of lying on the floor, the user hangs from a pull-up bar and brings their knees toward their chest.
- Why it works: It uses the same “bottom-up” pelvic tilt but adds the challenge of grip strength and full-body stabilization.
- Target: Lower abs and obliques.
2. Dead Bug (The Spine-Safe Alternative)
Lying on their back, the user keeps their core braced while slowly lowering the opposite arm and leg toward the floor.
- Why it works: It is arguably the best exercise for teaching pelvic stability. It forces the lower abs to work “isometrically” to keep the back flat against the mat.
- Target: Transverse abdominis and deep core.
3. Mountain Climbers (The Cardio-Core Alternative)
From a plank position, the user “runs” their knees toward their chest in an alternating fashion.
- Why it works: It mimics the knee-to-chest motion of the reverse crunch but adds a metabolic element, making it perfect for weight-loss-focused articles.
- Target: Lower abs, shoulders, and hip flexors.
4. Captain’s Chair Knee Raise (The Supported Alternative)
Using the gym apparatus with armrests and a back pad, the user lifts their knees toward their chest.
- Why it works: The back support prevents the “swinging” often seen in hanging raises, making it easier to focus specifically on the abdominal contraction.
- Target: Rectus abdominis (Lower portion).
5. Lying Leg Raises (The High-Tension Alternative)
Similar to the straight-leg reverse crunch, but instead of curling the hips up at the top, the focus is on the slow, controlled lowering of the legs toward the floor.
- Why it works: It places massive eccentric (lengthening) tension on the abdominal wall.
- Target: Lower abs and iliopsoas.
Reverse Crunches: Precautions and Common Errors
Common Errors to Avoid
- Using Momentum (The “Swing”): Many people use their legs like a pendulum, swinging them back and forth to lift their hips. It relies on gravity and physics rather than muscle fibers.
- The Fix: Move slowly. If you can’t pause at the top of the movement, you’re likely using too much momentum.
- Arching the Lower Back: If there is a “tunnel” between your lower back and the mat during the leg lowering phase, your abs have disengaged. It puts dangerous pressure on your lumbar discs.
- The Fix: Only lower your legs as far as you can while keeping your spine glued to the floor.
- Straining the Neck: Tucking your chin too hard or lifting your head off the mat can lead to cervical strain.
- The Fix: Imagine holding an orange between your chin and chest, or keep your head resting comfortably on the mat throughout the set.
- Kicking Straight Up: A common mistake is pushing the feet toward the ceiling in a “vertical” line rather than “curling” the pelvis toward the ribs.
- The Fix: Focus on the “curl.” Your knees should move toward your chest, not your toes toward the sky.
Essential Precautions of Reverse Crunches
- Herniated Discs or Back Issues: If you have a history of lower back injuries, the “curling” motion of the pelvis may sometimes aggravate certain illnesses. Consult a professional before adding this to a routine.
- Postpartum Awareness: Since you are writing for a health audience, it is essential to note that those dealing with Diastasis Recti (abdominal separation) should avoid reverse crunches until their core has been properly rehabilitated, as the pressure can worsen the gap.
- Hip Flexor Dominance: If you feel this move more in your thighs than your stomach, your hip flexors are taking over.
- The Adjustment: Focus on “tucking” the tailbone under to initiate the lift.
Conclusion
The Reverse Crunch is more than just a “lower ab exercise”—it is a fundamental movement for anyone serious about building a functional, resilient midsection. By shifting the focus from the upper body to a controlled pelvic lift, you effectively target the deep abdominal muscles that traditional crunches often miss.
Whether the prime goal is to improve athletic performance, correct posture, or define the “six-pack” muscles, the reverse crunch offers a safe & versatile solution.
Remember, the secret to success with this move lies in quality over quantity. Focus on slow, deliberate contractions, maintain a flat back, & avoid the temptation to use momentum. By consistently incorporating this exercise and its variations into your routine, you’ll build a foundation of core strength that supports every other movement in the fitness journey.